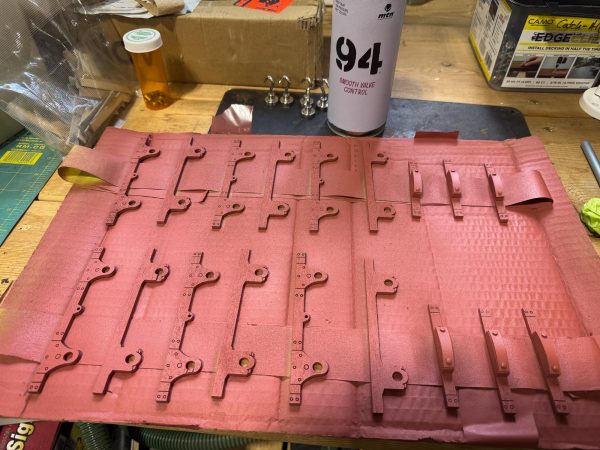
I finished up cutting and staining the planks for the slab cars and then moved on to painting the main components. A long time ago I purchased a couple of cans of Montana 94 matte spray paint for this project. Their RV-203 Oak Brown color seemed the closest to the weathered red paint seen on the cars at the National Slate Museum. I sprayed on one coat and let it dry for an hour or so. I then did a second touch up coat:
Photographed at the National Slate MuseumMontana MTN94 Oak Brown
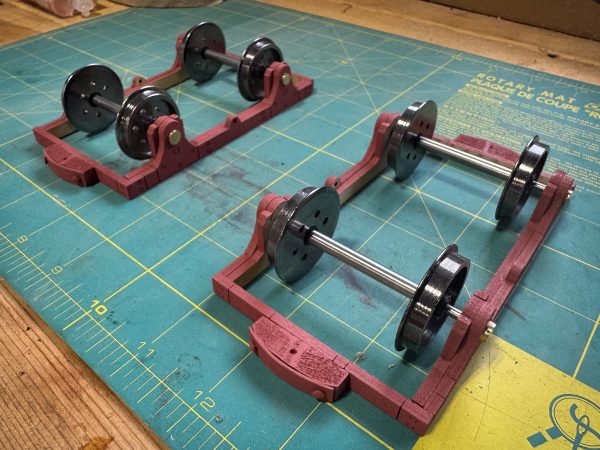
I then glued the inner sole bars to the outer sole bars, using the the brass bearing cups to align them. I had to further enlarge several of the holes; after messing a couple up with a small round file, I switched to a 1/4″ drill which worked better.
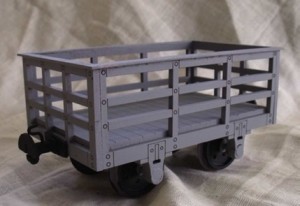
After many test fits of the brass bearing cups with the Accucraft wheelsets into the sole bars, I epoxied the cups in. I then glued the ends and the sides together:
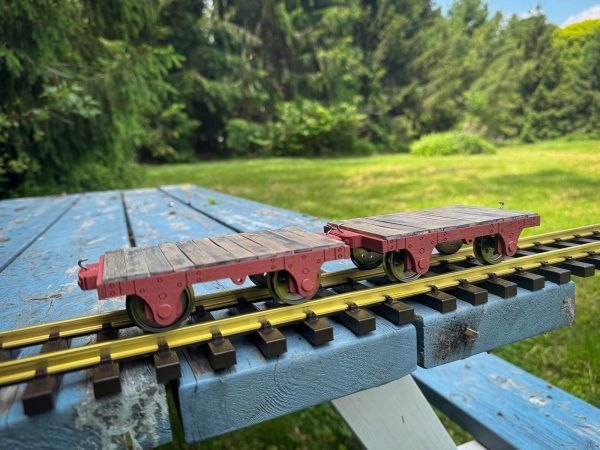
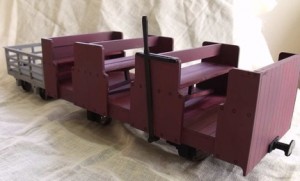
Next, I added the decking to the cars and added the coupling hooks. A quick touchup with the oak brown spray paint on the bearing cups and the cars were essentially complete:
I still need to weather the cars but that’s for the future. I’m pleased at the way they turned out and they are great additions to the MQR rolling stock inventory.
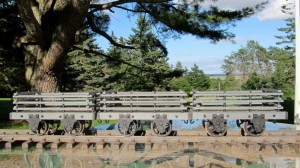
Well, it’s only taken me six plus years to get back to working on the slab cars. I’m using the following photo to guide the next steps of construction:
Photographed at the National Slate Museum (2014)
There is also a good reference webpage by Chris Bird on his build of the ACME Engineering slate wagons which uses the same construction methods.
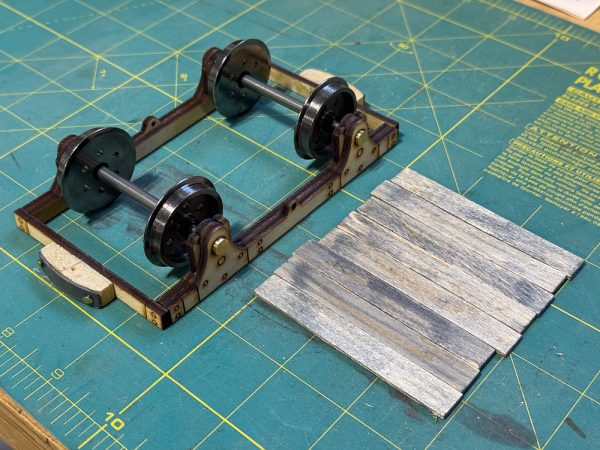
I started by epoxying the buffers to the end sills and trimming the brass pins to length. Then, using a round needle file, I enlarged the laser-cut holes for the brass bearing cups to get them to fit well. You can see from the photo below that I have been experimenting with Trade Secret stain markers to color the popsicle stick decking. I’ve found that the lightest colors of grey and brown are sufficiently dark to match the look of untreated wood.
Finally, some progress after 6.5 years!
Next up is paint which will be some variant of boxcar red.
Way back in 2013, I purchased a number of 7/8″ scale car kits from Acme Engineering in the UK while living in the Netherlands. Well, here it is late 2019, and only now have I had the time and space to start working on them. I purchased three slab and ten slate car kits so I thought I would start with the slab cars.
I purchased the kits with the Penrhyn-style buffers, but after reading many of Chris Bird’s articles on rolling stock (like this one on his build of the Acme slate cars), I’ve decided to go with dumb buffers for all of the MQR rolling stock going forward.
I purchased some dimensional wood from the local Michaels and ran it through my table router in which I mounted a tall ogee bit. This gave me nice wide-radius curves for the front of the buffer. I then glued the new buffers to the ends of the slab cars.
I decided to cover the face of the buffer with some plastic strip I had stored away for another long-forgotten project. And to finish it off, I used some brass pins to represent bolts holding the plastic “metal” buffer facing. Below is a photo of the buffers under construction; they still need to have the plastic and brass pins epoxied to the wood.
Slab Car Buffers in Construction
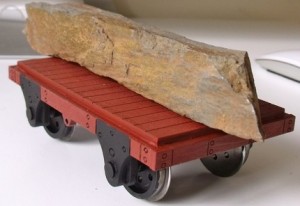
My least favorite part of the original slab car kit was the decking and so I decided to replace the decking that came with the kit with popsicle sticks to make a more interesting deck; something more like the lead photo.
Here is the proof of concept:
Slab Car with Popsicle Stick Decking (Proof of Concept)
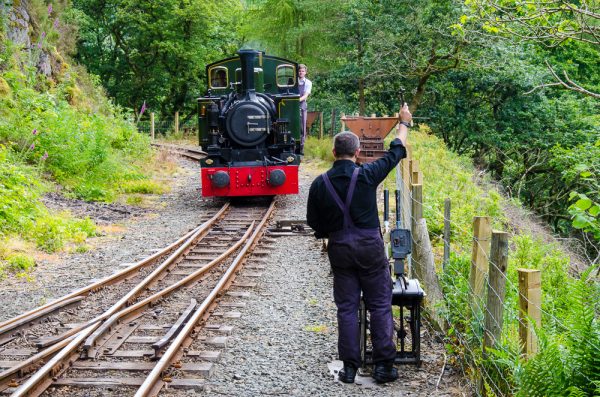
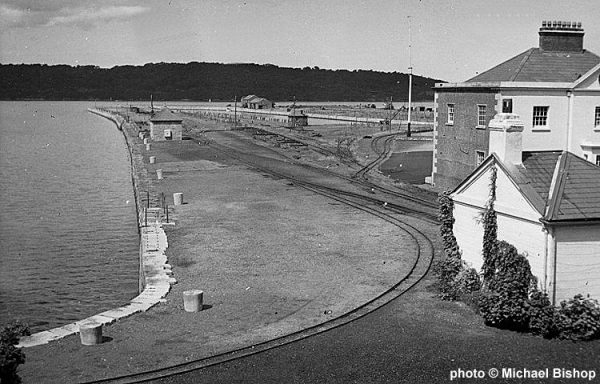
The other Welsh railway that I am basing the MQR on is the Talyllyn Railway. Unlike the Penrhyn Quarry Railway, the Talyllyn continues to run today as a tourist railway; it was sold to a group of enthusiasts in 1951. Robin and I rode it in 2014 and the photo above came from that trip.
I purchased a copy of James I. C. Boyd’s book, “The Tal-y-llyn Railway“, later on during that 2014 trip and have found it to be a great resource. Of course, the Internet also has plenty of information.
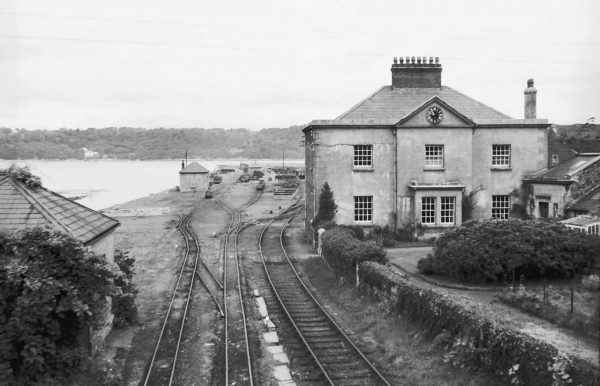
Wharf Station
This is the west end of the Talyllyn Railway. While today’s operations is heavily documented, photographs from the 1940’s and early 1950’s are relatively difficult to find. Here are two of Wharf Station in the early 1950’s. The size and scale of operations make a good fit for the MQR.
Towyn Wharf station, Talyllyn Railway with train,1953
Talyllyn Railway train at Towyn Wharf station, 1951
Stations Along the Line
While the Penrhyn Quarry Railway was primarily focused on moving slate, the Talyllyn had much more passenger service and some attractive small stations along the line. Brynglas is located about half way between the ends of the line and features the sole passing loop on the line.
Brynglas station, Talyllyn Railway, 1951
Dolgoch is another stop along the line. It features a water tank for upbound trains as well as a very photogenic viaduct over a stream.
Dolgoch station with train, Talyllyn Railway, 1951
My previous garden railway provided me a lot of enjoyment over its four-year life. It was simple in design, quick to construct, easy to maintain and quick to dismantle when we finally moved. It was a great first outdoor layout for me but as I look to design and build the MQR, I am planning on setting my sights higher.
I’ve been a member of the 7/8″ scale forum, The SE Lounge, since 2007. Over the years, members have documented the creation and development of their layouts. Here are three that have captured my imagination and will provide inspiration for the MQR design.
If you are not familiar with Rich’s layout, I strongly encourage to go through all 23 pages of the post linked above. The IST is a wonderfully executed garden railway that fully captures British narrow gauge.
Things I like about the IST:
The brick tub supporting and surrounding the IST is just gorgeous; it creates a nice edge which photographs well. However, Rich mentioned that it took a long time to construct. 30″ feels about the right amount of elevation to design for.
Rich’s design allows access to all parts of the layout.
Low track-to-scenery ratio.
Very simple track work: wide curves, little straight track, 5 switches in total.
Things I’d do differently:
I would like to have the option to run both point-to-point and continuously.
I am on the fence when it comes to the “pit”. It is a sunken area in the middle of the layout where people can sit and enjoy the layout from a different angle.
Rob Bennett is another well-known 7/8″ scale modeler from the UK. As I understand it, his Weston Railway was originally at ground level but was elevated in the late 2000’s. I mostly seen Rob’s layout through the various YouTube videos he has made.
Things I like about the Weston:
The two sets of spurs running off to the lower right give Rob the option of running point-to-point. They also serve as steam-up bays.
Things I’d do differently:
The Weston is quite a bit more complicated in track design compared to the IST and SLR: I count 16 switches in Rob’s diagram. I expect the MQR design to come in around 10 switches maximum.
Now that we are back in Canada full-time and know where we will be living long-term, I’ve initiated the planning process for the 7/8″ scale Marchlyn Quarry Railway. To start, I’ve pulled together a number of photos of the prototype Penrhyn Quarry Railway for reference and flavour.
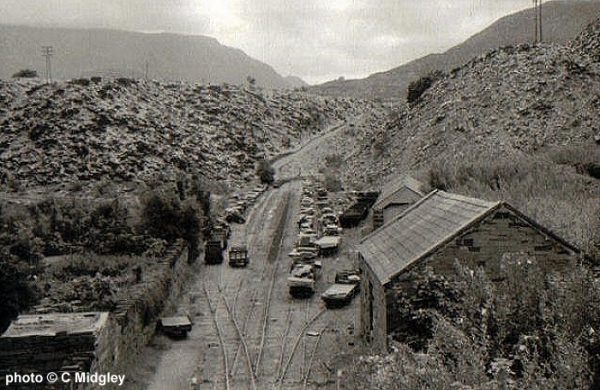
Coed-y-Parc
This was the south end of the Penrhyn Quarry Railway. Here the PQR connected with the slate quarry. Coed-y-Parc was also the location of the main slate dressing mills, the sheds for the steam engines as well as a small yard for marshalling the trains to Port Penrhyn. Coed-y-Parc featured a beautiful road bridge splitting the Coed-y-Parc yards in two. It also featured an impressive slate wall on the south side of its property that ran the length of the yard.
Coed-y-Parc Bridge and Wall, unknown date
Felin Fawr 1962
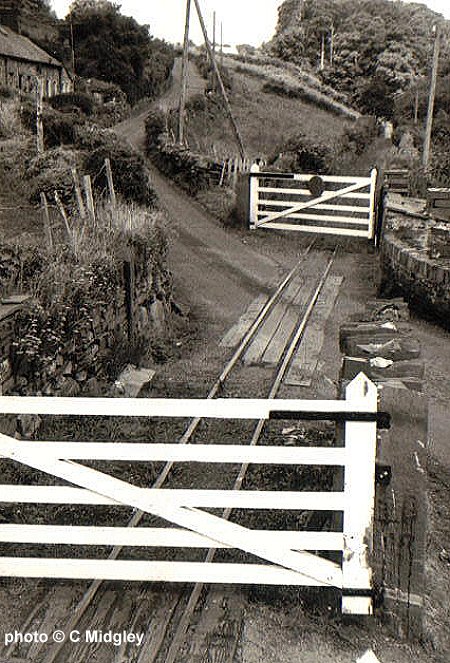
Hendurnpike Crossing
Just west of Coed-y-Parc, Hendurnpike featured a picturesque road crossing. The original crossing guard’s shed was still standing in 2013!
Hendurnpike Crossing 1962
Hendurnpike Crossing, 23rd February 2013
Tregarth
Tregrath was the location of the main passing loop about halfway between Coed-y-Parc and Port Penrhyn.
Tregarth Passing Loop, 1963
Port Penrhyn
Port Penrhyn was the north end of the PQR and where the finished slate was transferred to boats and ships for export. Port Penrhyn was also served by the standard gauge British Railway, making for some interesting trackwork.
The availability of digital satellite photos through services like Google Maps and Bing have yielded a wealth of information for the modern age modeler. One of the challenges though is how to leverage satellite photos inside powerful layout design tools like 3rdPlanIt. I’ve been working through this over the past few days and feel I’ve arrived at a good efficient process.
Let’s see how this works in practice. I’ve selected the Ingredion siding (formerly CASCO) in Port Colborne, Ontario on the Trillium Railway as an example. The Google Map is available here.
The first step is to get a screen capture from Google Maps of the area you want to model. It almost always pays to make the screen capture as big as possible. I use the Snipping Tool that comes with Windows with the Window Snip option to get the whole browser window. Go to Google Maps in satellite mode and zoom into the area you want to capture. I try to get down to a consistent zoom level which makes the next steps a little easier. The most important thing to remember is to get the little scale that Google puts on every map into the screen capture (using the Window Snip option should ensure this happens). On the screen capture below, the scale shows 20 meters since I did the screen capture in Europe:
Step 1: Get a Screen Capture from Google Click to Enlarge
Using the Save option in the Windows Snipping Tool, save the screen capture as a jpg and note the size of the jpg; on my system, the size of my monitor gives 1920 x 1168 pixel screen captures.
Next, open 3rdPlanIt and start with a fresh file working in feet and inches. The 20’x20′ default room is a good one to start with. It is also good practice to add a new layer to hold the aerial photograph:
Step 2: Set up an Aerial Photo Layer Click to Enlarge
The next step is to convert the dimensions in the 3rdPlanIt file to model scale units. There is a checkbox on the File/Settings/Units that you must click. This converts the dimensions in the 3rdPlanIt file to real-world units. For an HO scale drawing, every dimension gets multiplied by 87.
Step 3 Convert to Model Scale Click to Enlarge
Now with the Aerial Photo layer active, select the “Place Image” tool. Starting at the (0,0) corner (the lower left), click and drag your cursor until the size of the photo is about 19200″ by 11680″. This is the proportion of the jpg file multiplied by 10 and should just about fill the 20′ dimension. It is critical to keep the proportion of the jpg when drawing the object; once the image is placed in the right proportion, we can drag the upper right corner to bring the image to the final dimensions. Working in HO scale here and with the level of zoom I typically work, I find that I need to make the jpg image about 22 feet wide:
Step 4 Resize Photo Click to Enlarge
Once I’m at this point, I switch the units to meters to align with the Google Map scale and switch the layer to the Main Layer. Now, zoom into the Google scale section and the bottom right. Select the Draw Track and draw a piece of track from one end of the scale to the either. Now check the length of this track segment in the track detail box in the top right. If the two are close (say 21 meters compared to Google Maps’ 20 meter scale), then you are done. If they are significantly different, select the placed image again and grabbing the same upper right corner, increase or decrease the size of the image accordingly and redraw the check track segment again:
Step 5 Check Scale Click to Enlarge
Now you can return to the Main Layer and start drawing track right over the Google map. I usually start by putting turnouts down first. Next to be drawn are the end of the various spurs. I then use the SoftTrack connect tool to tie them together. If the Google Map satellite photo has railcars on the spurs, I’ll often add a couple of them from the Rolling Stock library to confirm I’ve got the scale right:
Step 6 Draw on the Aerial Photo Click to Enlarge
From here, you can just group the trackage in the Main Layer together, copy it and paste it into your layout design file as a Layout Design Element.
What’s nice about this approach is that it gives you a good feel of the track arrangements on the prototype and how much space would be required to model things faithfully. For the Ingredion spur, the prototype would take about 12 feet to model faithfully, a luxury many of us would not have. However, from here, we can build up our strategies to selectively compress scenes like this one for modeling.
After reviewing my last few posts here at Trains @ Station Studios, I realized that while I talked a lot about engines and rolling stock, I have not done a good job of explaining the back story of the Marchlyn Quarry Railway. So let’s fix that now.
I first ran across the narrow gauge slate railways of Wales back in 1988. I lived in London, England for three years in the late 1980’s and my cousins from Canada visited for a couple of weeks. While we spent a lot of time seeing the sights in London, we rented a car and drove to Wales for a week. We started in the south of Wales in the Brecon Beacons area and made our way north. When I learned that there was a narrow gauge railway running down from the hills at Blaenau Ffestiniog to the seaside at Porthmadog, I convinced the others that we had to go for a ride on it. It was a memorable experience.
After I returned to Canada, my modelling interests moved onto other things like the PM&TCo. But as I started to get more and more interested in garden and live steam railways when we lived in Texas, it was not long before I was coming across the Great Little Trains of Wales and the myriad of opportunities to use them as a theme for my next garden railway. My purchase of a 7/8″ scale live steam engine and three slate cars back in 2011 sealed the deal.
I thought about going pretty much fully freelance in the design but have always liked basing my model railroads closely on real prototypes. So I started to investigate the various slate railways that ran into the 1950’s. The most well-known four were:
I made the following Google Map to show where each of these railways where and the slate quarries each of them served (you can expand the map to full screen and zoom in to see the details more closely):
There is much to recommend to use any of the four as a basis for a garden railway, but in the end I think the Penrhyn Quarry Railway had the most interesting combination of operations, engines, rolling stock and buildings. To give myself some room to take inspiration from the other three railways, I chose not to use the Penrhyn Quarry name. Instead during my research I found that there was a short-lived slate quarrying operation lying just to the south of the main Penrhyn quarry. It was named the Marchlyn Quarry and so I chose to use it as the name of my 7/8″ scale railway.
So there you go: the back story to the Marchlyn Quarry Railway. There are several good online resources on the Penrhyn Quarry Railway which I’ll share in the next few weeks.
After returning from the OnTraXS 2013 model railway show, I started to think about doing some modeling again. I have been putting off some decisions until the eminent decision of where my next assignment will be, but decided last week to just get on with things.
I placed an order with ACME Engineering for a set of Welsh-style rolling stock including ten slate wagons, three slab cars and one workman’s coach:
ACME Engineering Penrhyn Slate Wagon
ACME Engineering Slab Car
ACME Engineering Penrhyn Open Workman Coach
Added to the three slate wagons purchased back in 2011, I now have a decent sized roster of rolling stock for my 7/8n2 garden railway:
Slate Wagons
Now all I need to do is set up a workbench to build them all.
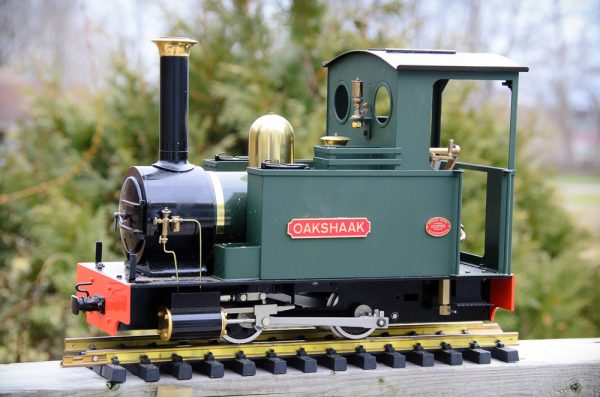
I was fortunate this weekend to surf over to the SE Lounge website and caught sight of a “for sale” announcement for a 7/8″ scale live steam locomotive and some rolling stock. The seller was Canadian and so I made contact and made arrangements to purchase it all. The photo above shows the engine, a Simply 7/8ths Baldrig kit on a Accucraft Eldrig chassis. The previous owner named it “Oakshaak” after the name used by the ancient Mi’kmaq for the New Brunswick town he lives in.
I also got three slate wagons as part of the deal: